Searching for a Shipment Declaration
In This Topic...
Each shipment declaration can be considered a folder, containing the shipments or bulk information to be submitted for that declaration. The Shipment Declarations Search screen is used to find the declaration, and the individual shipments and bulk information can be accessed from there.
To find an individual shipment directly, use the Query/List search and select Declarations as the Type Of Shipment.
Steps
-
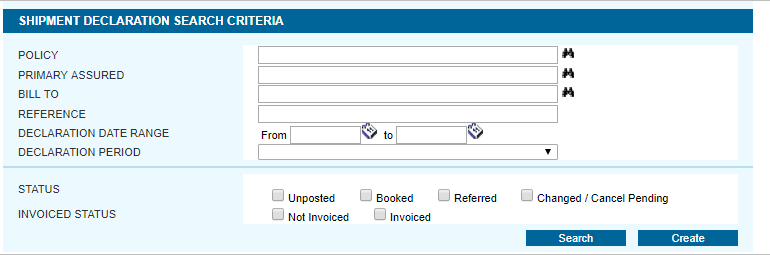
In the main menu bar, open the Shipments menu and click Declarations. The Shipment Declaration Search Criteria page opens.
-
Enter any combination of search options, or leave all fields blank and click Search to view all available declaration periods. All fields are optional.
Enter all or part of a policy name and click the lookup icon to select a policy. Enter all or part of the primary assured name. The lookup may be used to select it from the system.
Enter all or part of the billing company name. The lookup may be used to select it from the system.
To search for a specific declaration, enter the reference number for that declaration or any of the individual shipments attached to that declaration.
Enter a date range to find any declarations within a certain time period. The date range of the declaration must begin and end within the selected dates or it will not be included in the results.
To search for declarations within a certain period, select the period here.
Select the Status to find declarations with that status. Multiple status options may be selected.
The declaration has not yet been posted, and is open for additional shipments.
The declaration has been posted and booked.
The declaration has been posted, but has gone into referral for review by the insuring company.
Change or cancellation requests have been submitted for one or more individual shipments attached to the declaration.
Select the invoiced status of the declarations.
The invoice has not yet been generated for the declaration.
An invoice has been generated for the declaration.
-
The Shipment Declaration Search Results page opens above the search criteria form, allowing for changes to further refine the results. Click a link in the Period column to open that declaration.

Creating a Shipment Declaration
Each shipment declaration can be considered a folder, containing the shipments or bulk information to be submitted for that declaration.
If a policy is set up for declarations, it will define how often the declarations should be submitted. If it is set up for monthly declarations, then each declaration period will be one month. If it is set up for quarterly declarations, then each period will be three months.
Steps
-
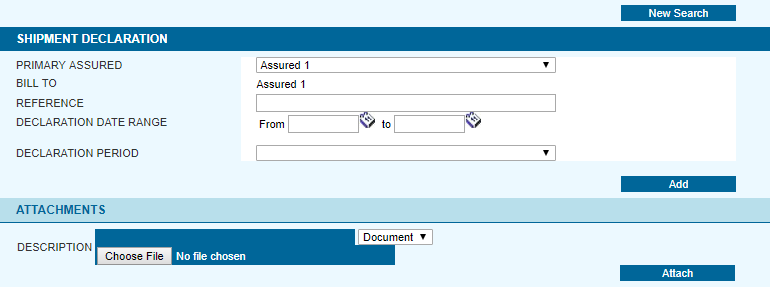
In the main menu bar, open the Shipments menu and click Declarations. The Shipment Declaration Search Criteria page opens.
-
Enter the shipment declaration information.
-
Click Add to create the shipment declaration in the system. It is now ready for the creation of individual shipments. If another declaration exists for the same period with the same dates, a warning message will appear asking for confirmation to create the newer declaration.
Note: Creating the declaration period does not post the declaration. It will need to be posted manually once all shipment activity has been added.
Attaching Documents to a Declaration
Documents or pictures may be attached to declarations. This can be used to provide additional information for other users viewing the declaration within the system.
How to attach a document or picture to a declaration
Steps
- Create a new declaration or search for and select an existing declaration.
- Scroll down to the bottom of the page to the Attachments section.
- Select if the file is a document or picture.
- Click Browse to open a standard Choose File dialogue box, and locate the file. Select the file and click Open.
- Click Attach. The new file appears in the Attachments section.
How to open a document or picture attached to a declaration
Steps
- Click the link in the File Name column.
- Choose to Save or Open the file.
How to edit or delete a document or picture attached to a declaration
Steps
-
Click the link in the Description column. The attached file will be highlighted, and the Description and Document/Picture fields will be filled in.
Three options will be available:
- If a file has been selected using the Browse option, click Attach to add a new file without altering the existing entry.
- The fields can be edited, including looking up a new file with the Browse button, then click Update to change the selected entry.
- The selected file can be removed using the Delete button.
Adding an Individual Shipment to the Declaration List
Once the declaration has been created, individual shipments can be added. The shipments may be created from templates, or entered from scratch as detailed below.
Steps
-
Search for and select a shipment declaration. The Shipment Declaration page opens.
-
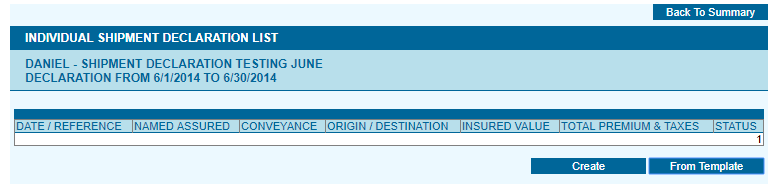
Click the Individual Shipments button. The Individual Shipment Declaration List page opens. Any shipments already attached to the declaration will be shown here.
Fill in all required fields in the shipment form.
Cargo information: Select the type of cargo, how it is being shipped, and the coverage.
Insured Value: This section is used to declare the sum for which the cargo is to be insured. Depending on how the policy is set up, some or all of the following may have to be entered:
For any questions about what amounts are insurable by the policy or how to calculate any of the above fields, refer to the insurance policy's Valuation Clause, available using the link to the right of the Insured Value section, or contact your insurance representative.
Conveyance: Provide the specific information about how the cargo is being transported.
Select the conveyance from the available options, as defined in the policy.
Route information: Enter the locations for the cargo origin and destination, as well as the ports or airports where the cargo was loaded and unloaded from the chosen transport.
Full Description of Cargo: Provide a complete description of the cargo.
- Click Add. The shipment will be added to the declaration, and the status can be viewed from the Individual Shipment Declaration List.
- Click Create or From Template to add additional shipments, or click Back To Summary to return to the Shipment Declaration window.
Changing or Deleting a Shipment Declaration
If a declaration is created with incorrect information, or if multiple declarations are mistakenly created for the same period, it may be possible to edit or even delete the declaration.
If a declaration has not yet been posted, it can be edited and saved, or it can be deleted along with all shipments and information attached to it.
If a declaration has been posted, it cannot be deleted. However, it can be edited if the user has the proper rights.
How to change a shipment declaration
Steps
-
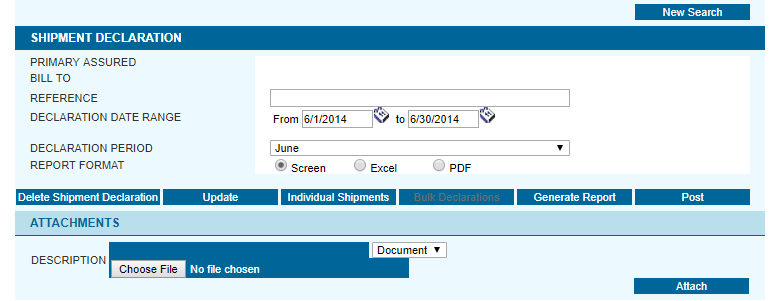
Search for and select the shipment declaration. The Shipment Declaration page opens.
- Make the necessary changes to the declaration details.
- Click Update. The declaration is saved with the new information.
How to delete a shipment declaration
Steps
-
Search for and select an unposted declaration. The Shipment Declaration page opens.
- Click Delete Shipment Declaration. The declaration is deleted, along with all shipments and bulk declaration information attached to it.
Changing, Deleting, or Cancelling an Individual Shipment in a Declaration
If an error is made on an individual shipment, duplicate shipments are added, or if the actual shipment is changed or cancelled, it may be possible to change or delete the individual shipment within a declaration.
If a declaration has not yet been posted, any individual shipments attached to it can be edited or deleted as necessary.
If a declaration has been posted, the individual shipments cannot be deleted. However, they may be edited or cancelled if the user has the proper rights.
How to change an individual shipment in a declaration
Steps
-
Search for and select the declaration containing the shipment to be changed. The Shipment Declaration page opens.
Note: The individual shipment may also be found using the Query/List search page. Check the box for Declarations as the Type Of Shipment. This will only show shipments from posted declarations.
-
In the Shipment Declaration page, click Individual Shipments. The Individual Shipment Declaration List page appears.
- Select a shipment by clicking the link in the Date/Reference column. The Individual Shipment Declaration Entry page opens.
- Make the necessary changes to the shipment details.
- Click Update. The shipment is saved with the new information.
How to delete an individual shipment in a declaration
Steps
- Search for and select the unposted declaration containing the shipment to be deleted. The Shipment Declaration page opens.
-
In the Shipment Declaration page, click Individual Shipments. The Individual Shipment Declaration List page appears.
- Select a shipment by clicking the link in the Date/Reference column. The Individual Shipment Declaration Entry page opens.
- Click Delete. The shipment is deleted from the system.
How to cancel an individual shipment in a declaration
Steps
-
Search for and select the posted declaration containing the shipment to be cancelled. The Shipment Declaration page opens.
Note: The individual shipment may also be found using the Query/List search page. Check the box for Declarations as the Type Of Shipment.
-
In the Shipment Declaration page, click Individual Shipments. The Individual Shipment Declaration List page appears.
- Select a shipment by clicking the link in the Date/Reference column. The Individual Shipment Declaration Entry page opens.
- Click Cancel. The shipment is cancelled, but is kept in the system for future reference.